|
You are here:
Home > Archive >
Tutorial - Class 323 and Cross-City South (BVE 4)

|
Rail Sim Routes UK - BVE Driver's Guide (Tutorial - Class 323 and Cross-City
South [BVE 4])

|
|

Reference Guide for BVE Drivers |
|
|
Reference Guide for BVE Drivers |
Welcome to the Rail Sim Routes UK Driver's Guide,
a new resource to help beginners and new BVE users learn the basics about driving
the trains used by the routes developed here at Rail Sim Routes UK. The Rail Sim
Routes UK Driver's Guide is a 'work in progress', and will be expanded over time,
but please use the links below to learn more about the subjects already covered.

|
|
|
Tutorial |
|
|
|
Introduction
This is a mini-tutorial to help you get started with driving the class 323 25kV
AC EMU on the Birmingham Cross-City South route, in BVE v4. This tutorial is aimed
at beginners and those who are not well versed on railway practice, but experienced
users may also find something of interest. For the purposes of this tutorial, you
should load the Daytime Spring 2005, Dry and Cloudy activity:
|
<System Drive>:\Program Files\BVE\Railway\Route\Birmingham_Cross-City_South_BVE4\xxxxDetail\Day\xxxxDetail_323_Spring_2005_1128_Dry_Cloudy.csv |
Down the left side of this guide you'll also see a simplified track diagram of the
Birmingham Cross-City South route, with the route you will take marked out in green.
This track diagram is designed to help you learn the locations of the permanent
speed restrictions along the line. Other details, such the locations of signals,
gradients, whistle boards, and other signs, you'll have to learn for youself as
you drive along the route. :)
Note: You can also download a PDF version of this tutorial
here [439KB], in case you want to print it out while you drive the route.
 You will
need
Adobe's Acrobat Reader to view and print the
PDF version of the Cross-City South / Class 323 Tutorial. You will
need
Adobe's Acrobat Reader to view and print the
PDF version of the Cross-City South / Class 323 Tutorial.
|
|
|
Starting at Redditch
 |
Upon loading the route, you'll find yourself in the cab of the class 323 EMU at
Redditch. First lets familiarise you with BVE v4's
window:
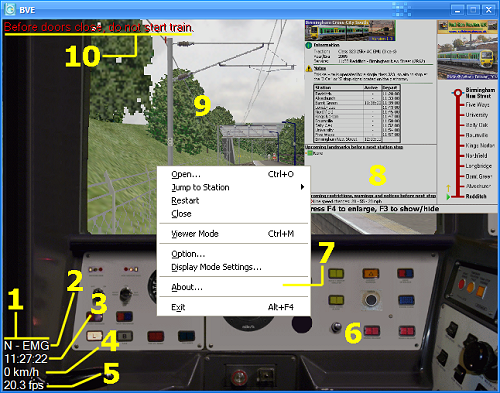
- BVE annunciation display [use 'F2' to change
displayed information]
- Reverser and Combined Power/Brake Handle position indicator
- Reverser annunciation shows either R (Reverse), N (Neutral), or F (Forward). [To control reverser, use 'Up'/'Down' Arrow]
- Power/Brake Handle annunciation shows EMG, B3, B2, B1, N, P1, P2, P3 or P4 [Emergency brakes can be applied by pressing '1'. To
apply service brake, press 'Q'. To release brakes/decrease power, press 'A'. To
increase power, press 'Z'.]
- Current Time
- Current speed (in km/h)
- Current framerate
- Panel
- Context Menu [Right mouse click]
- Pop-up Timetable [To enlarge/zoom, press 'F4'.
To show or hide, press 'F3'].
Note: The timetables included with the Cross-City South also feature a section on
the left for outlining upcoming landmarks and warnings, and also include a journey
progress indicator on the right. This information is updated at each station stop,
so read the display at each station to remind yourself of upcoming speed restrictions,
warnings or general points of interest.
- 3D view [use Numpad '0' or '.' to zoom in and
out, Numpad '4','8','6','2' to pan the view]
- BVE 'instructor' - displays driving tips and warnings
Now, lets familiarise you with the 323's cab layout:
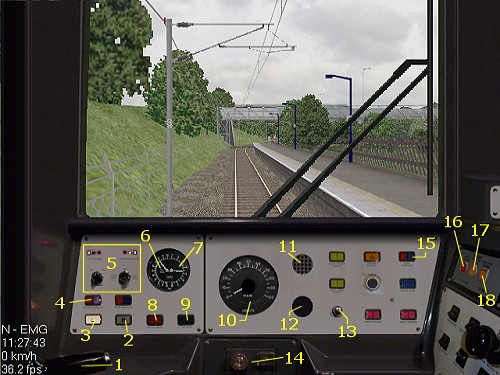
- Combined Power/Brake Controller [Emergency Brake:
'1'. Apply brake: 'Q', Release Brake/Decrease Power: 'A'. Increase Power: 'Z']
- Vacuum Circuit Breaker indicator (illuminates if the vacuum circuit breaker next
to the pantograph is opened, e.g. at a neutral section)
- Line Volts indicator (indicates voltage is detected from the overhead wires via
the pantograph)
- Battery Charger indicator
- 'Proving Lights' (headlight annunciators) and rotary switches
[Press '4' to turn tail lights on/off; press '5' to cycle through headlight settings
- see below for details]
- Main Reservoir brake pressure gauge
- Brake Cylinder pressure gauge
- Pan Up/Reset button (raises the pantograph) [Press
'2']
- Pan Down button [Press '3']
- Speedometer (mph)
- Speaker (for audible AWS sounds)
- AWS 'Sunflower' Instrument
- AWS Reset button ['Insert']
- Driver's Reminder Appliance (DRA)
[To activate or deactivate, press 'Spacebar' - see
below for details]
- Door Interlock indicator
- TPWS Brake Demand indicator
- TPWS Temporary Isolation/Fault indicator
- TPWS Train Stop Override button/indicator
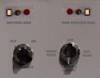
How the head and tail lights should be used - rotary switch positions and 'proving
lights':
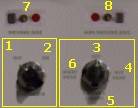
- Tail lights OFF
[Press '4' to toggle on/off]
- Tail lights ON
- Headlights OFF
[Press '5' to cycle through settings]
- Headlights - Day Time Configuration
- Headlights - Marker Lights Only
- Headlights - Night Time Configuration
- 'Proving Lights' for head/tail lights on driver's side
- 'Proving Lights' for head/tail lights on non-driver's side
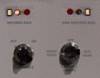
Common headlight configurations/examples:
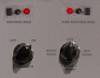 |
Tail lights ON (ensure these are OFF when travelling forwards!) |
 |
Daytime headlights ON |
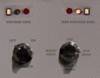
 |
Marker Lights only ON |
 |
Night time headlights ON |
|
|
|
|
Keyboard commands you'll need to use
BVE's keyboard commands, together with those specific for the class 323,
are generally laid out in groups which are as follows:
- Combined Power / Brake Handle
- Miscellaneous functions
- BVE simulator commands
- Driver's Reminder Appliance
- Main in-cab system controls
- Reverser controls
- Cab view pan and zoom controls
- Horn controls
1. Combined Power / Brake Handle:
|
'1' |
Apply Emergency Brakes |
|
'Q' |
Apply service brake in steps |
|
'A' |
Release brakes in steps OR decrease power |
|
'Z' |
Increase Power |
2. Miscellaneous Commands
|
'2' |
Raise the pantograph |
|
'3' |
Lower the pantograph |
|
'4' [Toggle] |
Toggle tail lights on/off |
|
'5' [Cycle] |
Set the headlights (day, marker lights only, night, off) |
|
'6' |
Signal guard with buzzer (1 buzz per button press) |
3. BVE Simulator Commands
|
'F2' [Cycle] |
Cycle thorugh the various BVE annunciation displays |
|
'F3' [Toggle] |
Show or hide the timetable display |
|
'F4' |
Zoom in to the timetable |
|
'F5' |
Reloads the current route (only works in BVE's 'Development
Mode'). If this feature is used, performance may deteriorate after the route
is reloaded. |
|
'F6' |
Forces the doors to close (only works in BVE's 'Development Mode') |
4. Driver's Reminder Appliance
|
'Space' [Toggle] |
Activate / Deactivate the DRA |
5. Main in-cab system controls
|
'Insert' |
AWS Reset button |
|
'Delete' |
Acknowledge Driver Vigilance Device |
|
'Home' [Cycle] |
Wipers on / speed up |
|
'End' [Cycle] |
Wipers slow down / off |
|
'Page Up' [Toggle] |
Enable / Disable TPWS TSS Override |
|
'Page Down'
[Toggle] |
Isolate AWS, TPWS, and vigilance device |
6. Reverser Controls
|
'Up Arrow' |
Push reverser handle away from you (Reverse > Neutral > Forward) |
|
'Down Arrow' |
Pull reverser handle towards you (Forward > Neutral > Reverse) |
7. Cab view pan and zoom controls
|
'Numpad 8'
|
Pan view up (works when zoomed in) |
|
'Numpad 2' |
Pan view down (works when zoomed in) |
|
'Numpad 4' |
Pan view left (works when zoomed in) |
|
'Numpad 6' |
Pan view left (works when zoomed in) |
|
'Numpad 0' |
Zoom out |
|
'Numpad .' |
Zoom in |
8. Horn Controls
|
'Numpad -' [Toggle] |
Sound a short high then low tone on the horn (due the way BVE works, the sound will
repeat until you press 'Numpad Minus' again) |
|
'Numpad +' |
Sound a low tone on the horn |
|
'Numpad Enter' |
Sound a high tone on the horn |
|
|
|
Step by step guide - Redditch to Birmingham New
Street with the class 323 EMU
Important Note: On your journey, you may
on occasion hear a louder high pitched 'beeping' sound (not
the beeping you hear when the doors are closing). This is the
Driver's Vigilance Device, and it sounds when you haven't moved the power/brake
handle or acknowledged any AWS warnings for a period of 60 seconds. If you fail
to acknowledge the Vigilance Device by pressing and releasing
[Delete] within 7 seconds, an emergency brake application will be made.
The Vigilance Device essentially offers some additional safety should the driver
become incapacitated or unconscious.
Second Important Note: If you 'jump' to
a station using BVE 4's 'Jump to station' feature (see the
BVE 4 Help Guide for more information), you may need to reset the AWS and
TPWS before you can proceed - immediately after 'jumping to' a station, simply apply full service brakes by pressing the 'Q' key until
the brakes are fully applied, and then follow the startup/self test procedure
in Step 1 under The Startup and Self-Test Procedure,
found below.
Upon entering the cab, the first step is to prepare
the unit for departure.
This unit has just arrived at Redditch (from Birmingham),
and you join the cab after changing ends. The unit already has power and the pantograph
is raised, but you need to insert your driver's key and run through the startup
and self-test procedure.
The Startup and Self-Test Procedure:
- Master/Reverser Switch to ON - move the Reverser to Forward, then back to Neutral.
[Press 'Up Arrow' once, then 'Down Arrow' once]
- The panel lights will now illuminate
- In a moment, the AWS and TPWS will self-test. TPWS indicators
will illuminate, the AWS 'Sunflower' instrument will show the sunflower and then
revert to black, the brakes will apply, and the AWS horn will sound continuously.
Press the AWS Reset button ['Insert']
to end the self-test. The horn will cease, a short bell will be heard, the brakes
will release, and all TPWS indicator lights should extinguish.
- Ensure that the Tail Lights are set to OFF (see the headlights section above for
further information).
- Set the headlights to the daytime configuration
[Press '5' once] (see the headlights section above for further information).
- Check the Line Volts indicator is illuminated and the VCB indicator is extinguished.
Departure:
- The guard will close the doors, and signal you via two buzzes; informing you that
it is safe to depart. Acknowedge the guards buzzer by replying with 2 buzzes [press '6', twice]
- Move the Reverser to the Forward (F) position.
['Up Arrow']
- Deactivate the Driver's Reminder Appliance (DRA) by pressing
['Space']. Ensure the red DRA indicator light extinguishes. If the DRA is
activated, you won't be able to draw power.
- Move the combined power/brake handle to P1,P2, P3 or P4 to release the brakes and
begin accelerating. To hear a more accurate rendition of the class 323's 3 phase
AC traction motor acceleration sounds, you can safely move the power handle to P4
immediately. As the brakes release, the brake cylinder gauge will show a decrease
in pressure to 0 bar, and you'll hear air release sounds outside of the train. You'll
then hear the 'thunk' of a relay and the train will draw forward.
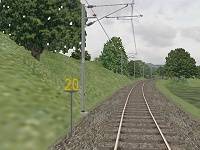
- Just beyond the platform at Redditch, you'll see your first
Permissible Speed Indicator, showing the speed limit beyond Redditch station
is 20mph, so as you accelerate towards 15mph, start to ease back the power handle
so you don't exceed 20mph.
- There are some steep downward gradients on departure from Redditch. Keep your speed
in check by periodically moving the power/brake handle between B1 and N to maintain
speed.
- Beyond the first overbridge, you'll cross a road underbridge and see an
AWS magnet. On passing over it, the AWS horn will sound, and the AWS sunflower
will show. Within 3 seconds, press the and release the AWS Reset button
['Insert'] to cancel the warning - the horn will cease, but the AWS sunflower
will remain visible. If you don't press the AWS Reset button quickly enough, an
emergency brake application will be made, the TPWS Brake Demand indicator will flash
red, and you will be unable to release the brakes until the train has stopped, and
60 seconds have elapsed.

- Further along, you'll see you another Permissible Speed Indicator, showing you can
accelerate to 55mph. If you are driving a single class 323, then you have 3 coaches,
so judge when your last coach has passed the Permissible Speed Indicator and then
accelerate to 55mph.
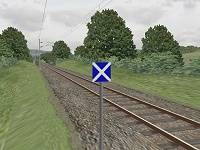
- As you accelerate, you'll also notice a blue sign with a white cross on your left
- an AWS Cancelling
Indicator. This sign indicates that you may disregard the last AWS warning
you recieved - in this case, the AWS magnet and the associated warning apply only
to trains travelling in the opposite direction towards Redditch.
- A couple of minutes later, you'll encounter a
Whistle Board. On passing this sign, you should sound one high note and one
low note using the horn. [Press 'Numpad Enter' for
the high note, followed by 'Numpad +' for the low note]. This horn serves
to warn people who may be using the upcoming foot crossing to stand clear of the
line.
- As you pass beneath the next over bridge, you should begin to decelerate for the
upcoming 20mph speed restriction at Alvechurch station. In the interests of passenger
comfort, you should use brake handle positions B1 or B2. Only use B3 or EMG (Emergency
Brake) if you have to!
- When you enter the platform at Alvechruch, look out for the
'S' Car Stop sign fitted to the lamp post at the far end of the platform - aim
to stop directly by this sign. If you undershoot the guard will press his buzzer
button 6 times, and you should draw forward and stop at the correct location. If
you overshoot, then the guard will send you 3 buzzes, and you will have to set the
Reverser to 'Reverse' and set the train back into the platform.
- Once you've arrived, wait until you hear the doors close and recieve 2 buzzes from
the guard - perform the same procedure with the buzzer as you did at Redditch, and
then depart.
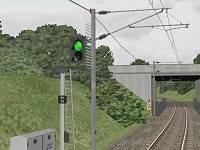
- Around a mile further along, you'll encounter another AWS magnet, and your first
signal. Usually this Distant Signal will be green, and if so you'll hear an AWS
'bing' sound, and the AWS sunflower instrument will turn black - no action is required
on your part.
- The next signal will probably show a single yellow - this means the following signal
is showing a red aspect, and you must be prepared to stop at it. Cancel the AWS
horn as you did earlier.
- On the approach to Barnt Green you'll traverse a sharp curve, don't be alarmed by
the loud squealing of wheel flanges against the outside rail! If the sprinkler system
fitted between the rails is activated, you may hear less pronounced flange squealing
sounds.
- After leaving Barnt Green you will notice a double yellow signal - this means the
next signal is showing a single yellow aspect, and the next but one signal is showing
a red aspect. You can continue to travel reasonably fast past the double yellow,
but must begin braking before passing the single yellow - just to make sure you
can stop in time for the red signal.
- As you approach the red signal before Longbridge, and if the line ahead is clear,
you may notice the aspect change before you reach it - this is because this is an
'approach controlled' signal - it is deliberately held at red until you are near
to it, to force you to slow down in time for the junction. You will also notice
the feather illuminate above the signal, indicating that you will be taking the
diverging route to the left, i.e. crossing over to the slow line.
- On arrival at Longbridge, look out for the '3' Car stop sign - as you're driving
a single class 323, this is where you should aim to stop. You're now on your own
until Kings Norton...

- On departing Kings Norton, you will see your first
Banner Repeater - this tells you if the signal around the curve is showing a
red aspect or not.
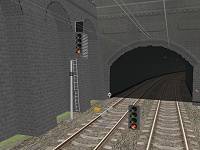
- As you round the curve after Kings Norton, you'll enter a short tunnel - 'Pershore
Road Tunnel'. You may wish to sound your horn upon entering the tunnel. You'll now
have to reach the approaches to Birmingham New Street by yourself!
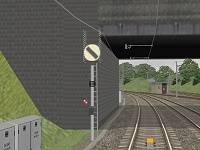
- On the approaches to Birmingham New Street, the last tunnel you'll enter is 'Holliday
Street Tunnel'. At the entrance to this tunnel, is a 4 aspect signal with a 'theatre'
type route indicator which will show a number - the platform you'll be entering,
and a Ground Repeater, which shows the same aspect as the main signal next to it.
Notice as you emerged from Canal Tunnel (the previous tunnel), how you saw the Ground
Repeater aspect from within the tunnel, before you could see the main signal? This
is why it is installed at this location - to give you better visiblity and more
warning of the signal. You may also notice the small
AWS Gap sign at ground level, this indicates that there is no track mounted
AWS equipment fitted beyond this point, although there is
TPWS equipment installed.
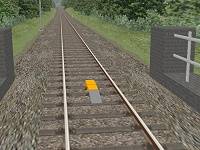
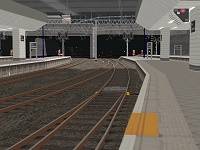
- On entering the station throat at New Street, you should have slowed to 10mph, and
should maintain this speed throughout the station area. Half way along the platform,
you'll see a 'middle signal' showing a single yellow aspect - this means you are
cleared to draw forward to the second half of the platform (in this case, platform
8a). Aim to stop at the orange marker painted on the platform edging.
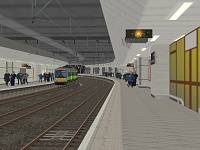
Congratulations! You've completed your first duty on the Cross-City
line. Why not try again, but this time in rain and fog, or even at night?!
If you spot any other lineside signs but don't understand their meaning, check out
the Lineside Signs section of
the Rail Sim Routes UK Driver's Guide.
|
|
|
Content last updated: 25th January 2009 |
|
|